How to sign a transaction offline with AnuBitux

Signing a transaction in an offline working environment could be a good idea if we are worried about exposing our private keys online. The only phase in which a transaction needs an internet connection is the broadcast, when it is sent to the network, so, the steps that require the private key can be done locally and offline. This is also the principle on which hardware wallets are based.
Let's see two methods to do this kind of operation.
Method 1: Electrum
Electrum is a very simple to use client wallet, but it also integrates advanced features. Let's assume that we need to send a transaction. To sign it offline, we can set-up a watch-only wallet with the addresses we want to use in our transactions. This wallet will sync the balances of the addresses with the network, but will not give us the right to send transactions.
In this phase we may want to use AnonSurf to preserve our privacy. To run it we can use the proper shortcut on AnuBitux's desktop, named "Start Anonymous Mode".
Now, as we are used, in the "Send" panel we can fill the "Pay to" field with the recipient address and the "Amount" field with how many bitcoins we are intended to send and then click on the "Pay..." button.
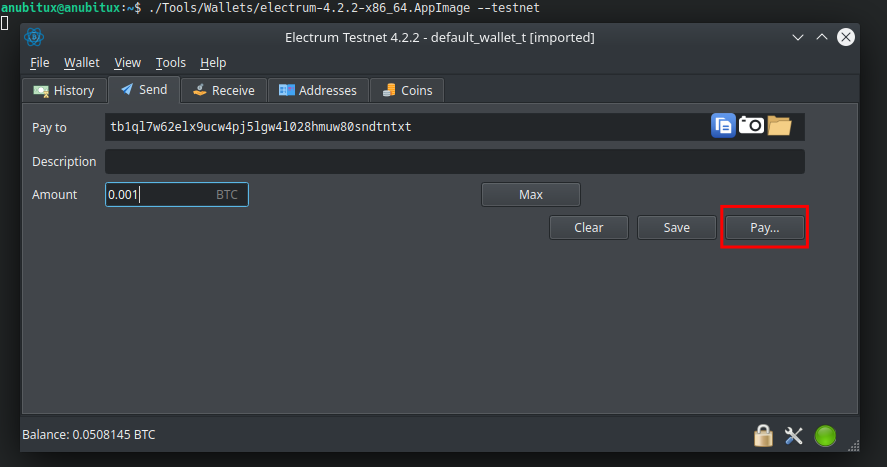
The address shown in the picture could seem a bit strange. That's because we are using Bitcoin's testnet and not the mainnet. To use Electrum in the testnet, you can start it from your terminal, launching the correct AppImage with the "--testnet" option, as we can see at the top of the previous picture.
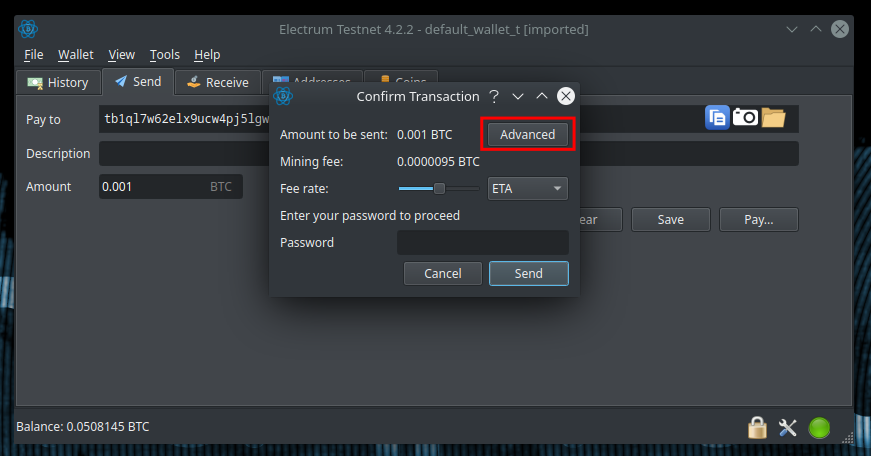
Clicking on the "Pay..." button, we will see a new window, where we could type the wallet's password and confirm the payment. Instead, by clicking on the "Advanced" button, we will see another window, where we could manage the details of the transaction.
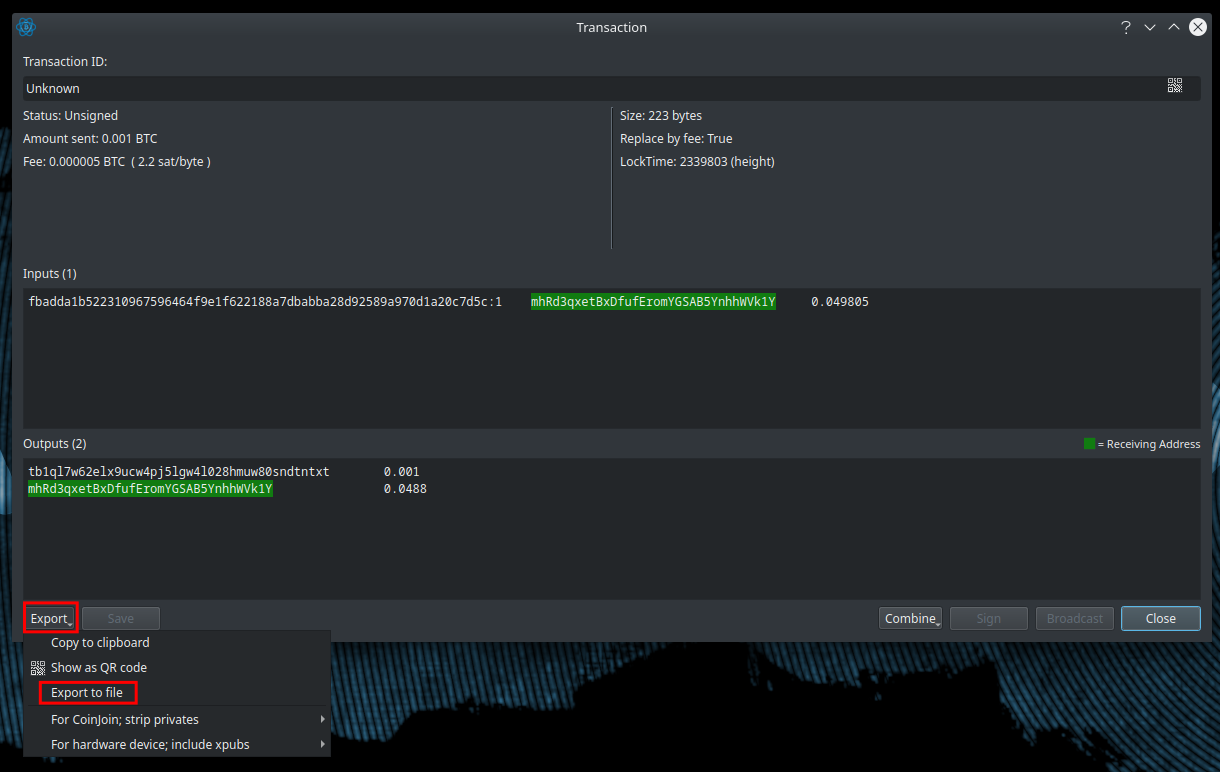
In this window, we can see a lot of information, like the inputs used in the transaction, the output addresses (receiver and change), the amounts they will receive, the transaction fee, etc.
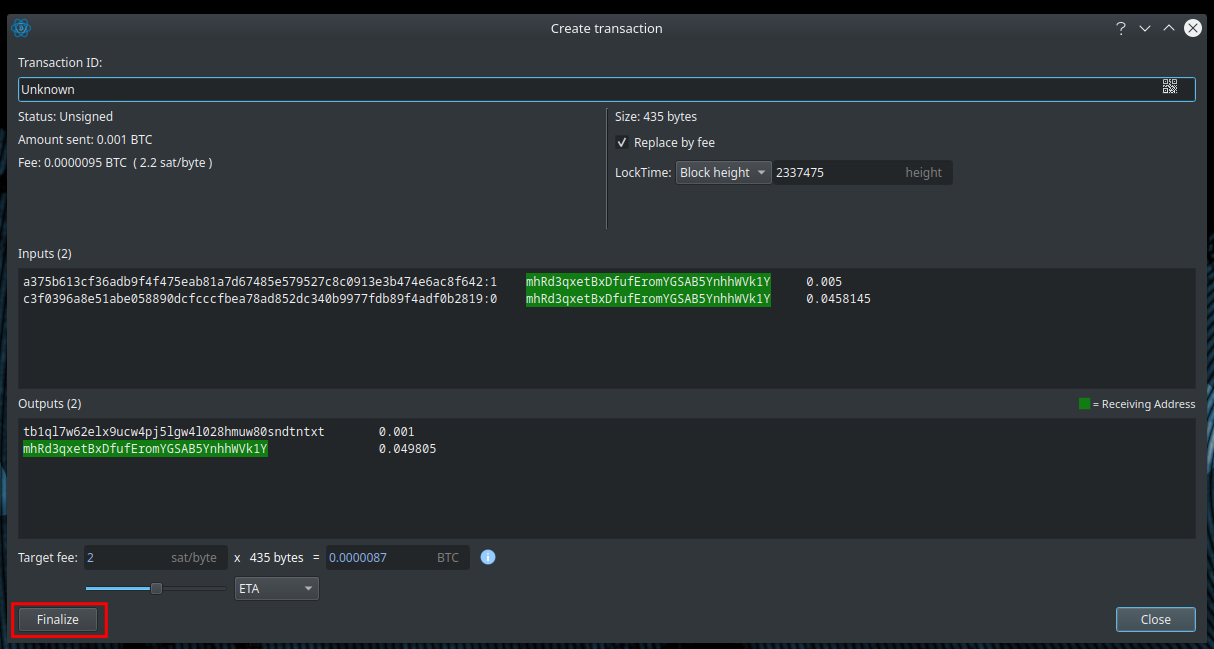
Clicking on the "Finalize" button, we will be able to export the transaction to a file by clicking on the proper button.
Now we can save the file to an external storage, like a USB drive and reboot AnuBitux. Then we can disable the networking features using the proper desktop shortcut and open the Electrum wallet containing the same addresses we used in our watch-only wallet, but including their private keys. This could be a wallet obtained by importing the private keys in Electrum or a wallet derived from a mnemonic seed.
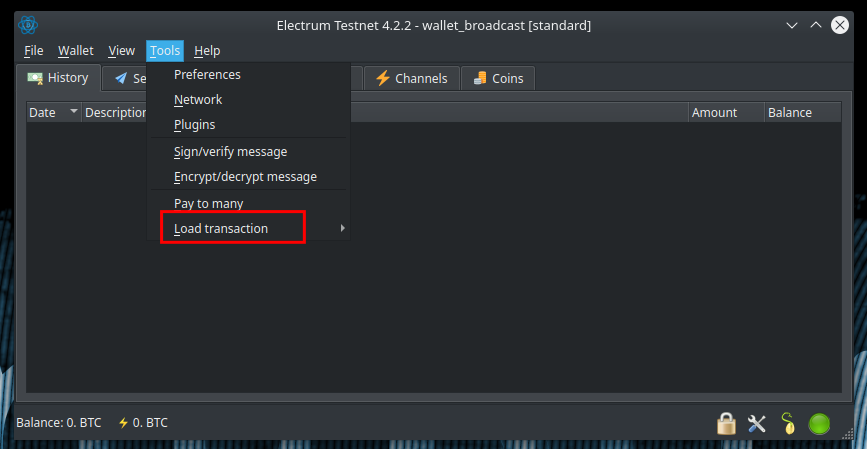
Now clicking on the "Tools" menu and then on "Load transaction" we will be able to load a transaction from a file.
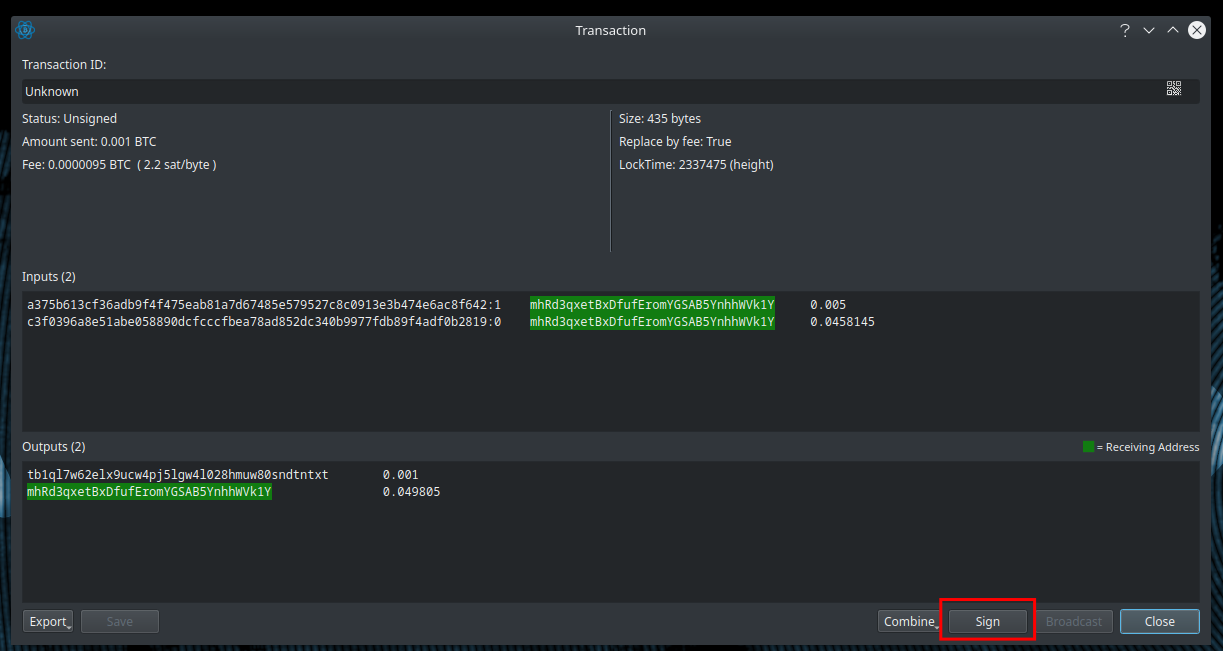
Now we will see all the details of the previously arranged transaction, but we will also be able to sign by clicking the proper button and providing the wallet's password.
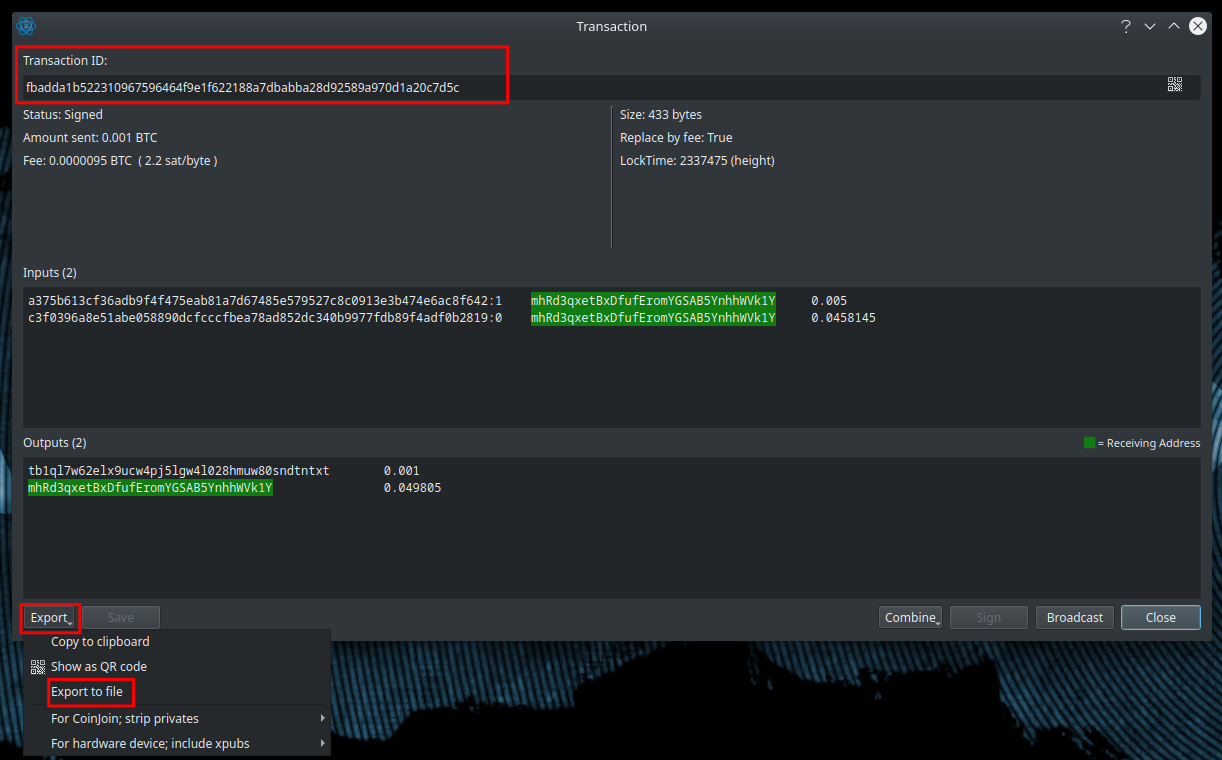
After signing the transaction, at the top of our window, we will see the Transaction ID that, by now, has been "Unknown" since the transaction was not signed.
At this point we need to export it again to a file, reboot our AnuBitux, connect it to the network and open a random Electrum wallet, preferably an empty and unused one. Now we can load the transaction's file again (as we have done before) and click on the "Broadcast" button to send it to the network.
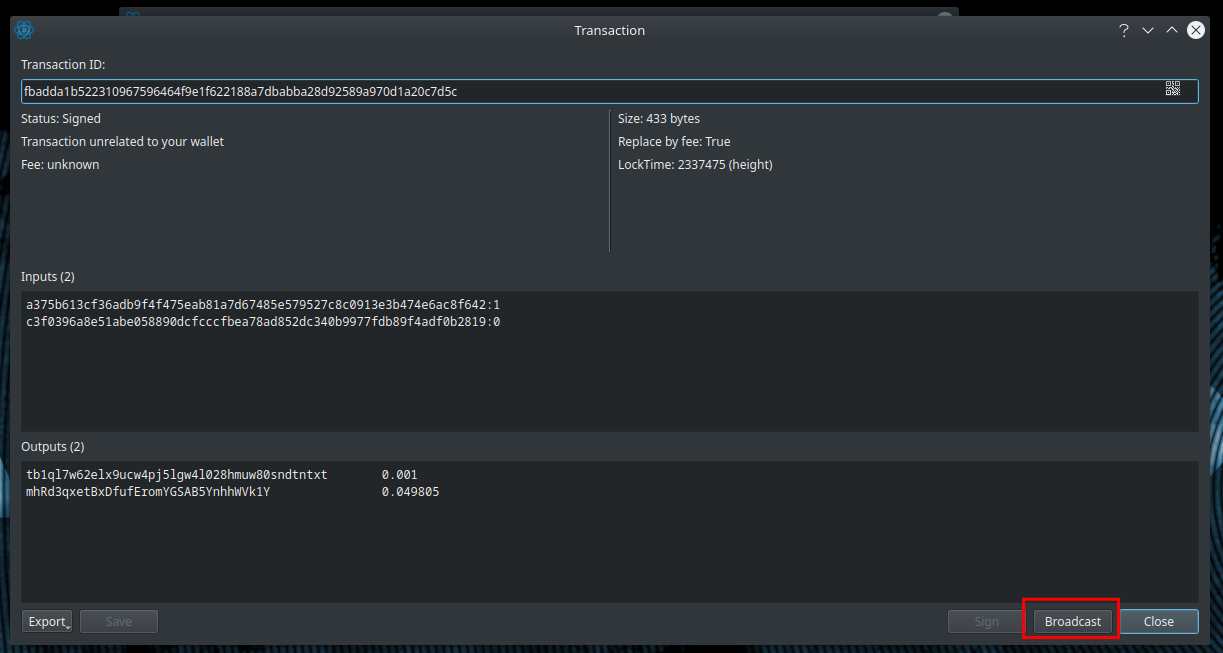
Now, without asking for any password, since the transaction has already been signed, it will be sent to the network.
In this phase we may want to use AnonSurf to preserve our privacy. To run it we can use the proper shortcut on AnuBitux's desktop, named "Start Anonymous Mode".
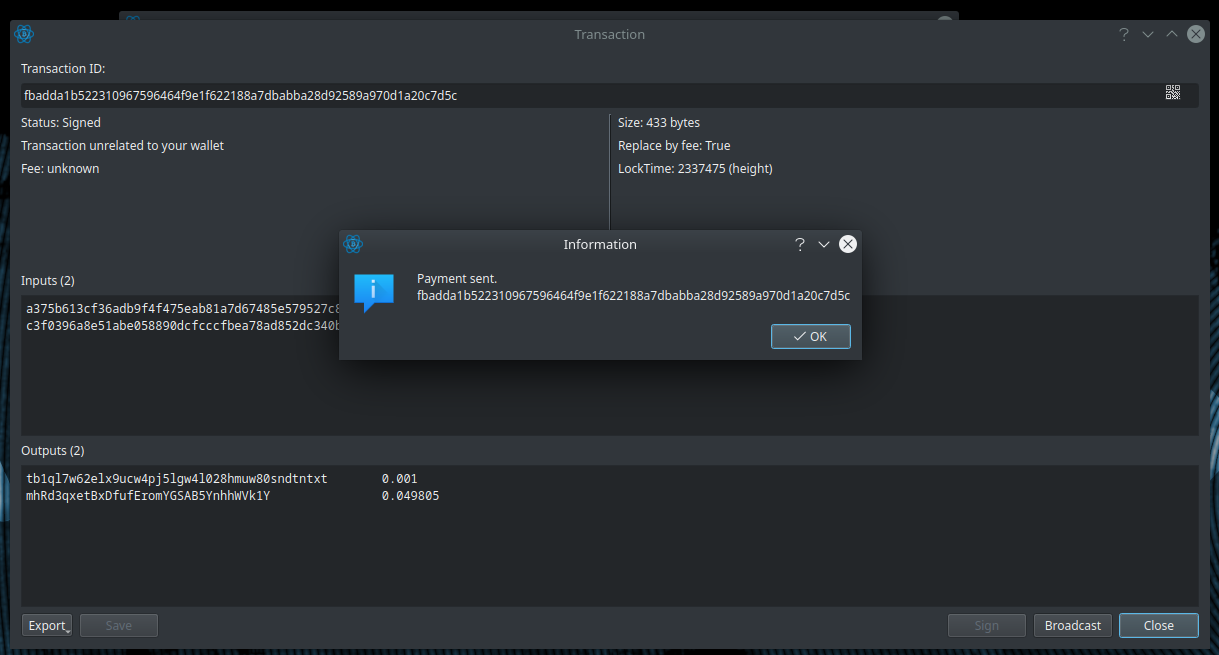
By doing so, we were able to send the transaction to the network with a wallet that had not to access to the private key of the sending addresses.
Method 2: coinb.in
Coinb.in allows us to arrange a transaction from scratch. We will be able to choose all the UTxOs we want to send and, providing the private keys of the involved sending addresses, we will obtain a signed transaction. It also allows us to broadcast previously signed transactions. Let's see in depth how it works.
It has an easy to use user interface, divided into panels that we have to use in sequence.
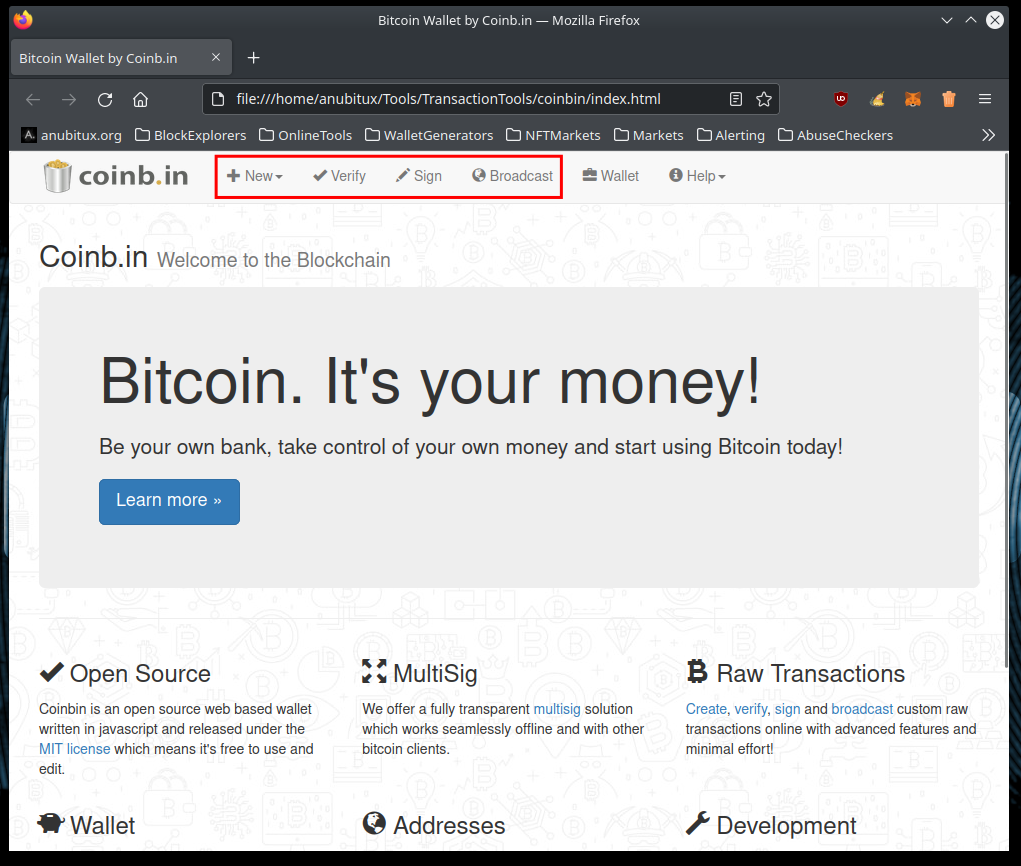
For our purpose, we can disable networking features using the proper desktop shortcut and start the Coinb.in tool from the AnuBitux menu under the "TransactionTools" section.
Then we can start the procedure by clicking on the "+New" button and then on "Transaction".
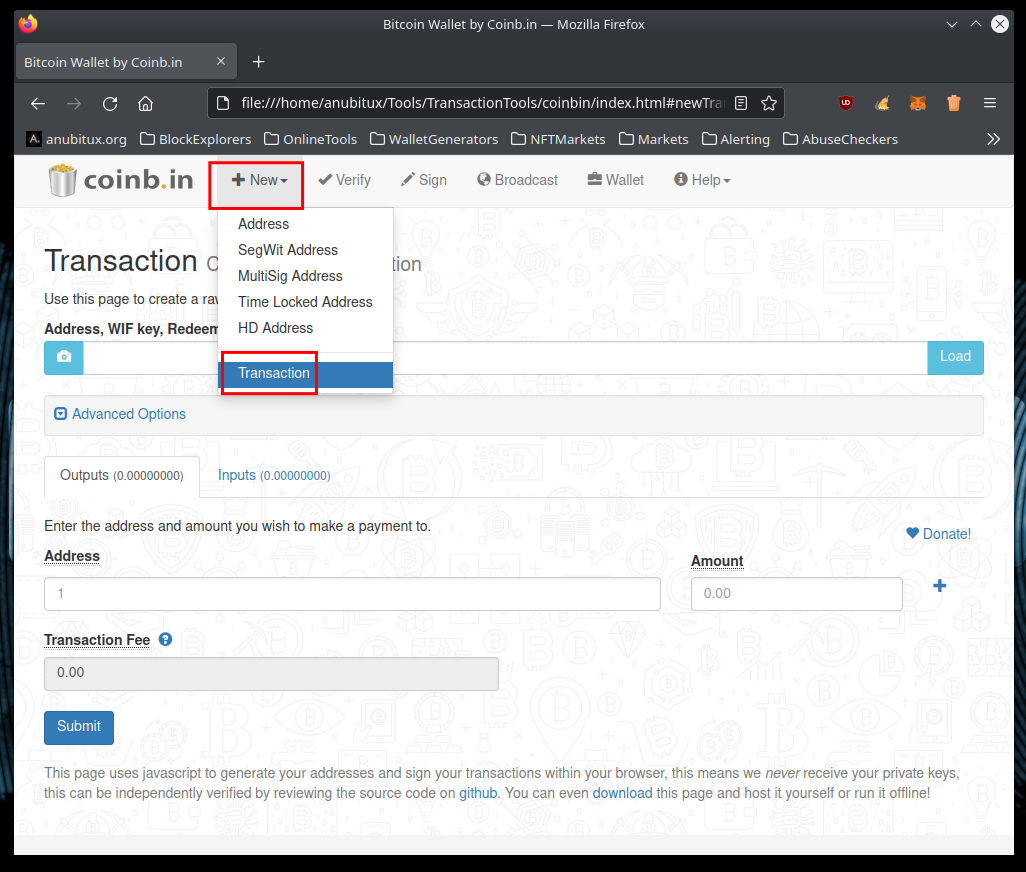
Here we can fill out the "Outputs" section with the addresses we want to send bitcoins to and the corresponding amounts. The "Transactions Fee" field will be filled out automatically later.
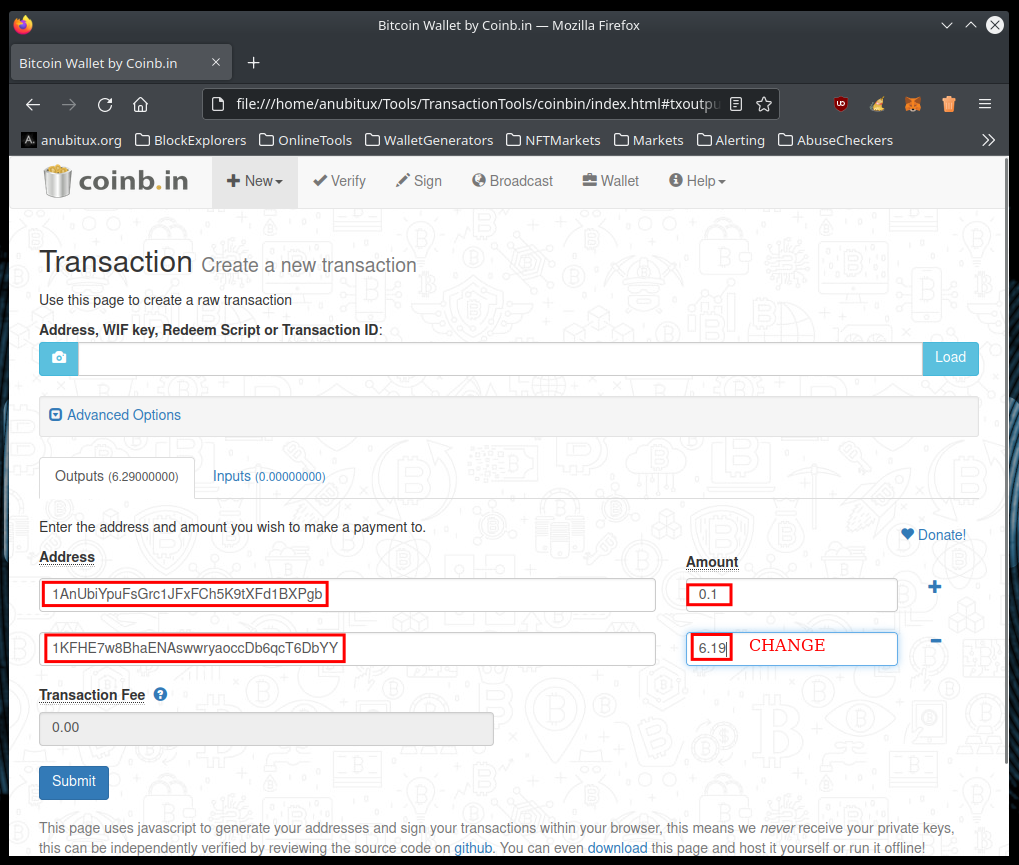
Note that we need also to manually specify the address where the change has to go. To see how change works, you can refer to this post.
Now we can move to the Inputs section, and specify the UTxOs we want to involve in our transaction. After compiling this section, the fee field will be automatically filled, with the difference between Input and Output amounts.

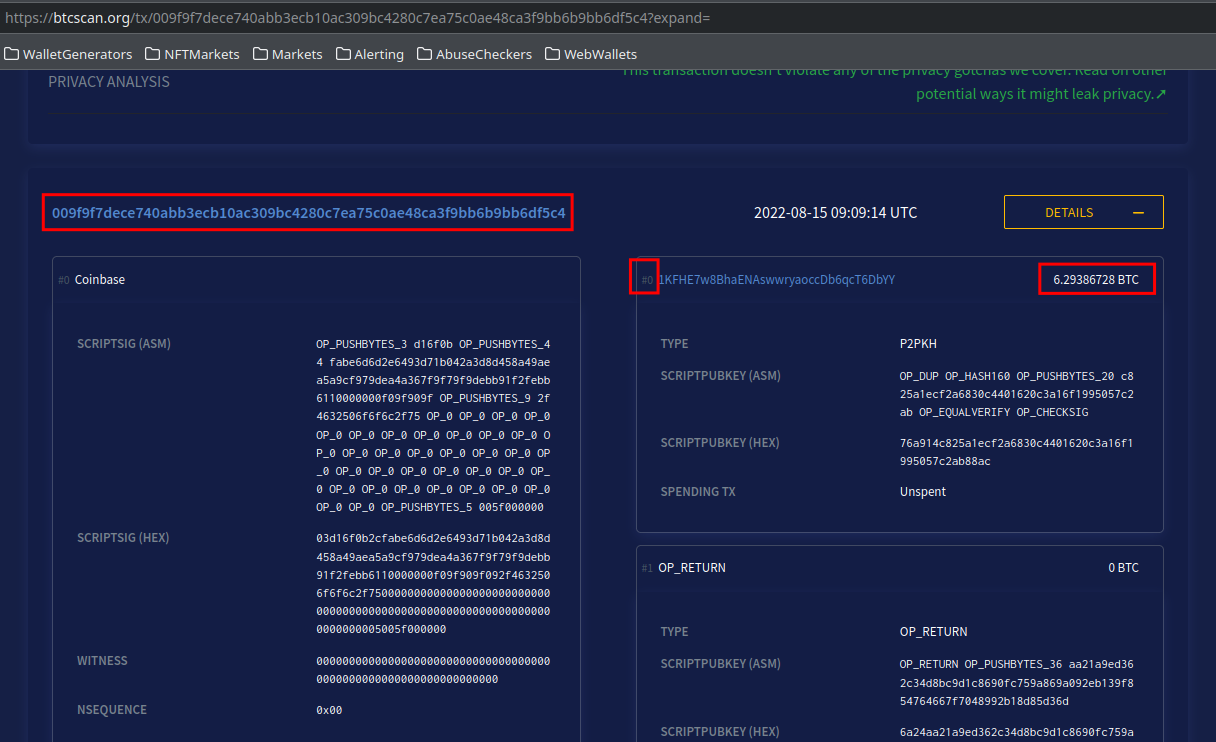
We need to provide the hash identifier of the transaction with which we received the bitcoins we want to spend, the number of the UTxO that can be observed visualizing the raw transaction with a block explorer and the corresponding amount.
We should retrieve this information before arranging the transaction since, in this phase, we are working offline. To use block explorers safeguarding our privacy we may want to run Anonsurf, using the proper desktop shortcut named "Start Anonymous Mode".
At this point, by clicking on "Submit", we will obtain an unsigned transaction.
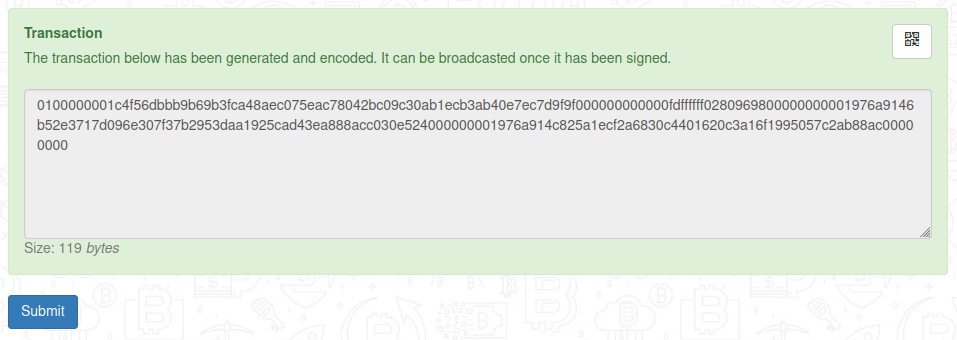
Now, we can copy the obtained string and, after moving to the "Verify" panel, we can paste it and review the transaction details.

If it fits our needs, we can move to the "Sign" panel and proceed with signing the transaction. To do that we need to provide the private key corresponding to the addresses that received the transactions we indicated in the Inputs section.
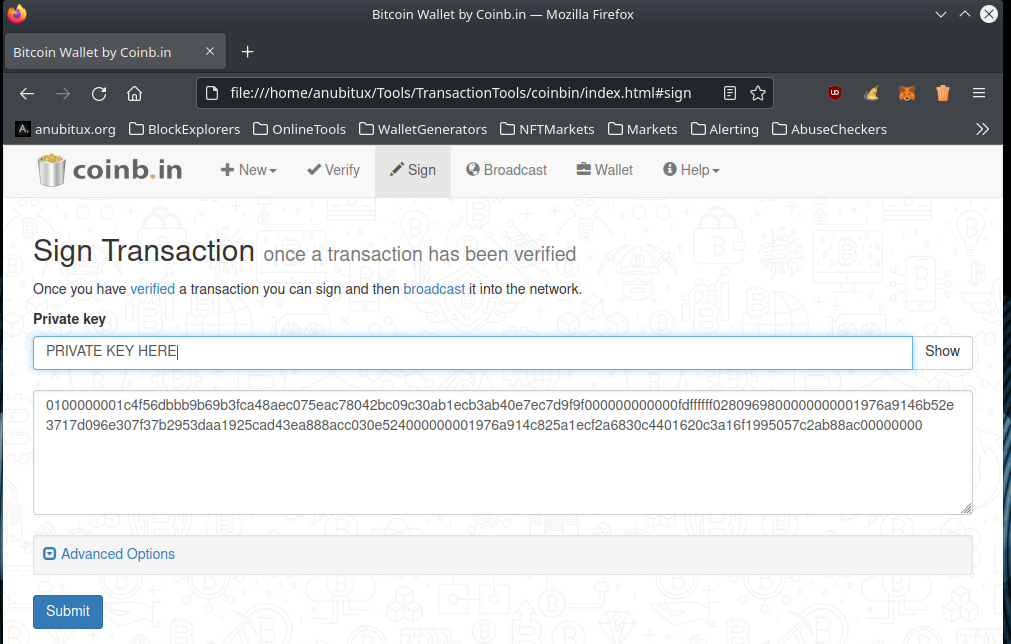
In this case, we are using a randomly chosen transaction and we do not have the corresponding private key. To proceed, we need to click on the "Submit" button to sign the transaction and then we can store the obtained string in a text file on external storage.
Now we should reboot our AnuBitux, connect it to the network, enable Anonsurf with the proper desktop shortcut (optional but recommended) and then we can launch coinb.in again and go to the "Broadcast" panel.
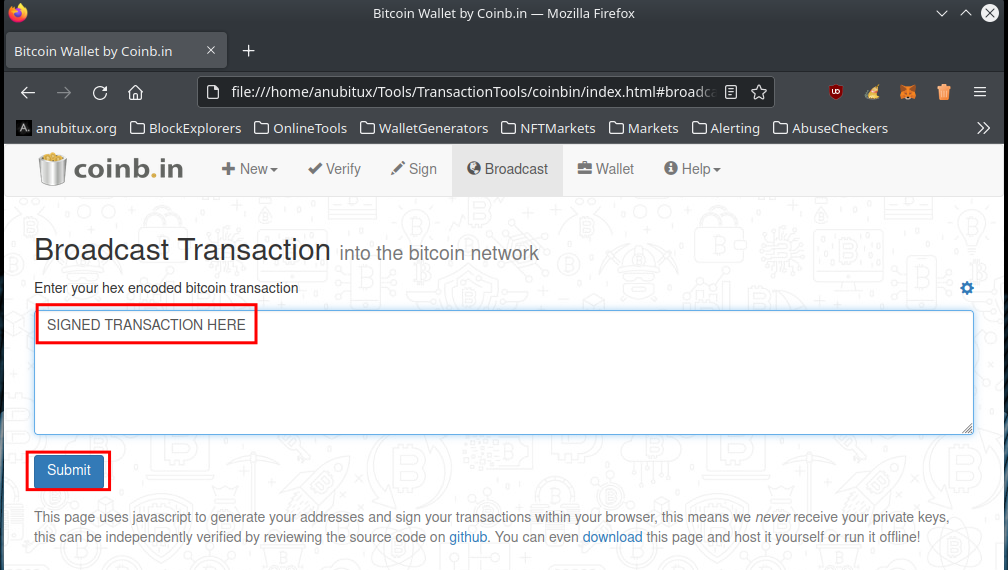
At this point, clicking on the "Submit" button, the transaction will be sent to the Bitcoin network and, if it is valid, it will be included in one of the upcoming blocks.
Final thoughts
We have seen how to sign a transaction offline, avoiding the risk that using a compromised device we could leak our private key. The shown procedures could seem a bit complex, but it is only a matter of practice.
In the example, we worked with Bitcoin transactions, but the procedures work also for other coins. For example, we could use Electrum's forks for other coins like Bitcoin Cash or Litecoin.
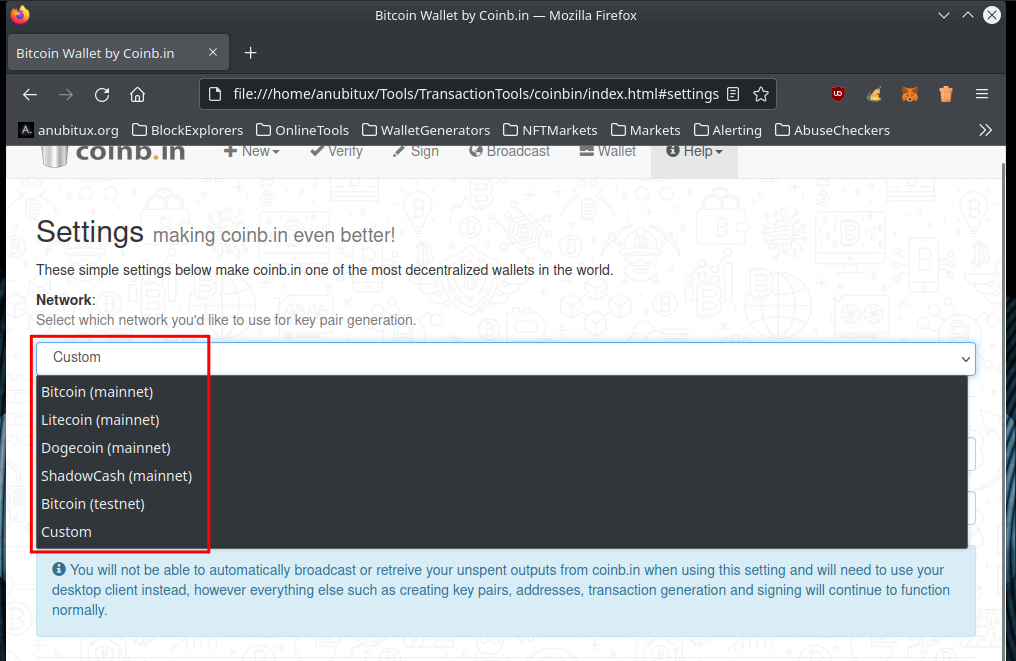
Alos the coinb.in tool works with different networks, as we can see in the following picture. So we could use the same procedure for all the supported coins.